Saturday, April 12, 2014

Latest Picks

I haven't had a chance to do lots of stargazing lately.  Between poor weather, work and other commitments its been tough to find time.  However last week spent about an hour looking at the moon. I'm not especially interesting in the moon, it just seems like the weather only cooperates up to a point.  Last week the night started out clear but I could tell clouds were closing in so there wasn't much point in any deep sky photography.  I took some quick spectra of Sirius and then took a high resolution picture of the moon.

Siruis Spectra
About two months ago I bought a Star Analyzer diffraction grating.  It looks just like a normal 1.25" filter but is actually a low resolution diffraction graphing which effectively turns my telescope into a spectroscope. I've found a nice program for analysing the resulting specturm; the image below is a screen shot of a quick run through of a Spectrum of Sirius.


Its pretty easy to see the Hydrogen Balmer lines (which are the dips in graph).  I know there is more detail in the graph I can pull out but I'm still figure out how to record all of it.  More to come on that later.

Lunar Panorama
I've taking many pictures of the Moon over the past few years.  This one was the highest resultion and took the most time.  Its a result of over 15,000 images! I used my 11" SCT with a Lumunera Lu135m.  The field of view was only about 20" so it required 16 panels that were then merged in photoshop. Each of the panels was made up of 1000 images that were processed in Registax.  The actualy time to acquire all the pictures wasn't more than about 30 minutes but the processing and photomerging took over 2 hours.  The end result is a great, highly detailed image of the moon!


Saturday, March 1, 2014

EQ8 and a cold winter of Stargazing

My new mount arrived about 3 months ago (a big thanks to Nick and everyone else at the Vancouver Telescope Center!).  I must say sheer size of the EQ8 completely blew me away.  I thought the EQ6 was decently sized by by comparison the EQ6 is just a toy. Aside from the size and weight the mount performs beautifully.  Tracking is amazing and it easily carries my SCT, Refractor and Imaging gear.

Last winter I was limited to setting my telescope up in my driveway, spending about an hour getting it properly aligned and then checking on it periodically.  That has all changed! Since I got my Skyshed Pod set up in the backyard I no longer have to set up and take down my telescope or cart all the gear back inside.  I really only had to align it once at the beginning of the winter (although since the ground froze it has shifted a bit).  The best part is that I can run the mount, camera and autoguider all from the comfort of my house using Teamviewer.


Ironically, despite the fact that I have a ready to go observatory at my disposal there have been few observing opportunities.  Until recently its been an incredibly cloudy, snowy winter.  And now that its clear its unbearably cold; with the windchill it was -50 last night! Although I don't need to be outside to run anything, temperatures that cold are not good for the equipment- my cutoff is around -25.  I've also been working with my new Monochrome CCD camera to try and figure out exactly how to process images with it.  I think I've gotten most of the bugs out of that; now all I need is suitable observing condition.

Throughout the winter Jupiter has been well positioned for observing. At its transit I think its over 50o.  Below are some of the few images I've taken this winter; all are taken with my Lumenera 135m video camera and stacked using Registax.

  
This image of Jupiter is the first composite (LRGB) planetary image I've taken.  I used a monochrome camera with LRGB filters and combine the images using Nebulosity.  If I remember correctly, this was 5000 L frames and 1500 each of RGB, using the best 20%. 


This high resolution photo of the Compernicus crater was taken through my Celestron 11 HD using a Lumenera 135m camera.  500 frames, stacking the best 15%.

About 3 weeks ago, (if you used an appropriate solar filter) there was a set of sunspots you could see without a telescope.  Here in this image (taken with my 85 mm refractor) you can see two groups of sun spots.  Each of the central sunspots is larger then the entire Earth!
 

Here is a close up of the largest part of the sun spots.  Its slightly out of focus for some reason, but still amazing detail. The dark central area is called the Umbra and its the location on the Solar Surface where the Sun's magnetic field is nearly perpendicular to the surface.  The lighter area is called the Preumbra area and occurs because the magnetic field is at more of an inclination to the rest of the surface.

Hopefully the weather improves and more astronomy can be done!


Sunday, October 13, 2013

A Month of the Moon

Over the past year I haven't had near as many opportunities as I'd like to do astrophotography.  Its been due to a combination of factors including weather, moving, and the birth of my daughter.  However I have been able to get quite a few nice shots of the moon.  The picture below shows 5 different phases of the moon that would roughly follow it over its 27.3 day period.


This wasn't actually taken over a single month.  Like I said weather tended to get in the way from one day to the next so it actually took me nearly a year to get all 5 images; if you've been reading my blog you've probably noticed one or two of them individually. 

Interestingly enough many people are actually confused about why we see different phases of the moon.  It definitely has to do with the moon orbiting around the Earth.  But it has as much to do with the position of the sun as it does with the moon.  Think of the moon like a giant mirror.  The moon doesn't create its own light. Just like a mirror it reflects light.  And where does that light come from?  The sun!  Now if the moon is on the opposite side of the Earth as the Sun all that light gets reflected towards the Earth.  But if the moon and the sun are on the same side of the Earth NONE of the light bounces towards the Earth.  In fact, if the moon and the sun align just right the moon can actually block the sun's light and we get an eclipse.

The image above shows the arrangement of the Earth, Moon and Sun (off to the right) that leads to the lunar phases.

A full orbit of the moon takes about 27.3 days (It actually takes the moon 29.5 days to reach the same position in the sky because while the moon is moving so it the earth.  That's called the synodic period b). Its no coincidence that a lunar orbit corresponds to a full month. Early calendars were based on this lunar cycle. 

Its also interesting to note that we don't see a solar eclipse once a month as you might expect.  While the moon moves between the Earth and the Sun every 27.3 days it doesn't always line up with the sun. That's because the moon's orbit is inclined about five degrees with respect to the sun's orbit.  That means that there are only a few times a year when a solar eclipse is possible.  In order for an eclipse to actually occur at one of those times they must occur at the new moon (when the moon and the sun are on the same side as the Earth. The diagram below gives a good visual of this.


The only times a Solar Eclipse can happen is when the moons shadow falls on the Earth.  As you can see from the diagram there are lots of times when the lunar shadow is above or below the Earth but only a few when it actually hits the Earth.

So the next time you look up and see the moon in sky try and figure out where it is in relation to the Earth and Sun!

Tuesday, September 3, 2013

Spectroscopy

With the (more or less) completion of my observatory I've turned my interested to Stellar Spectrums.  I borrowed a Star Analyzer diffraction grating from a friend to test it out.  The Star Analyser looks just like a threaded 1.25" filter and screws into the T-ring of my camera.

Unlike a filter it doesn't so much block light as it does spread it out.  Much like a prism, the diffraction grating spreads the spectrum of light so each colour or wavelength is visible.  Depending on the star being analyzed different absorption or emission lines will also be visible.

This is actually one of the most interesting accessories I've ever seen for a telescope.  I've had some baby issues to take care of so I haven't actually been out in the observatory as much as I'd like to I did manage to get some great results.  Before I get to that  though I should mention a few things about the diffraction grating.  It doesn't work like a typical 1.25" filter.  Instead of simply putting it in front of the eye piece and looking for the spectrum its important to make sure the distance between diffraction grating and your eye (or in my case camera) is long enough.  Otherwise the spectrum won't spread out very much and it will be difficult to look at the absorption or emission lines.  As well, if you use a camera of some sort its also important to make sure the grating lines are perpendicular to the CCD.

I'm using this with a telescope and DSLR but its actually designed to work with a CCD imager.  However as you'll see it works fairly well on the DSLR/telesocpe combination and I can't see any reason why it wouldn't work with just a DSLR and lens as long as you could find a way to attach the diffraction grating to the front of the lens.

The spectrum below is of Altair.

I forgot to switch modes so this is a monochrome image.  It actually doesn't make much difference to the absorption lines, a few of which you can see really clearly.  I moved the telescope very slowly in DEC which sort of smeared the spectrum vertically to make the lines easier to see. The bright dot on the left hand side is the central maximum with the spectrum itself off to the right.  Two of the Balmer lines are visible on the left side of the spectrum; had this not been a monochrome image it would be in the violet and blue part of the spectrum. 

 The next spectrum I looked at was actually of the sun.  Its a bit more complicated than just pointing the telescope at the sun since you need a point source to shine through the diffraction grating.  I used a sewing needle to reflect sunlight off of and pointed my telescope at that.  The solar spectrum is below:


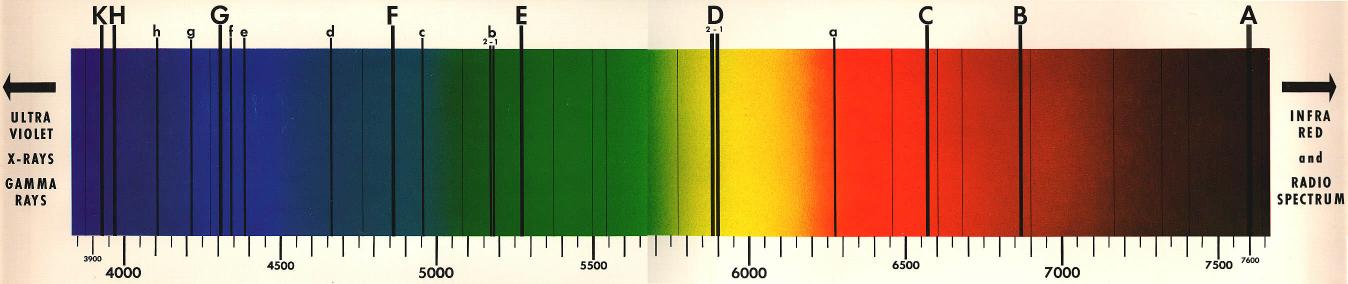
The needle was off to the left. The image is a bit washed out because the sun is SO bright that it saturated some of the camera pixels.  If you look closely you can see a number of absorption lines in this emission spectrum. Those lines are the finger prints of all the elements in the cooler atmosphere of the sun.  There, elements too cold to emit light themselves but they absorb specific wavelengths of light that pass through them. Using a professional grade diffraction grating/CCD the lines look something like this:


There is much more I'd like try with the diffraction grating but that will have to wait.  For the time being I to put a concrete piling in my backyard and set up my new mount which will hopefully arrive in the next couple of weeks!