Tuesday, December 23, 2014

Years of Improvement

During the past few months I've finally tweaked, pulled and prodded my telescope into a nice, useable research tool. The biggest issue was finally resolved about a week ago when I got my autoguider to work.  The EQ8 apparently had a software glitch in the firmware that doesn't let it guide for more than about 10 minutes.  However once I updated the mount's motor control software it worked like a charm. 

The timing couldn't have been better; my favorite winter constellation has started rising around 9:00 pm (Orion!). 
  
OIII - 2 x 600s

So over the last two weeks I trained my Esprit 100 mm on Orion for hours using my new Monochrome SBIG 2000XM. Since I'm imaging from Suburban Edmonton I'm basically limited to Narrowband Filters.  I'm not quite done, but I've gotten 20 x 10min HA.  I'll need a couple more nights to get comparable OIII and SII images since I only have 2 x 10 min of each of them.

SII - 2 x 600s


The images on the right are the result of stacking, dark and flat reduction and some basic curve stretching.  They were stacked using Deep Sky Stacker and Stretched/Aligned using Nebulosity

Photoshop is next on my list of software to get but I'm not a fan of their decision to go to a subscription service.

HA - 20 x 600s
For anyone unfamiliar with LRGB processing, each of the frames is taken through one particular filter at a certain wavelength (HA - 656.28 nm, OIII - 495.9 nm, SII - 6730 nm).  These images are then aligned and combined in an LRGB image.


I used the Hubble Colour Palette which maps the SII frame to the Red Colour Channel, HA to Green and OIII to blue.  The result is the image below. Its a bit noisy and lacking in detail in some areas because of the low SNR of the OIII and SII images.

LRGB Orion Nebula


Wednesday, October 22, 2014

Experimenting with Long Exposures


Having finally worked out 90% of the bugs in my observatory I've begun trying some long exposure narrowband imaging.  Until recently all my exposures were less than 5 minutes or less.  Recently I've been experimenting with 10 - 30 minute sub-exposures.  I've noticed that while my tracking is good its essential to have a rock solid autoguiding.  And the payoff it great.  Even from my heavily light polluted urban locale I can still get exceptional detail out of my images.

Over the past month or so I've been imaging a few different targets.  First was NGC 6992, the Viel Nebula.  I started with mostly HA but then realised the signal strength was pretty low; I'm still trying to figure out why. I'm not sure if its the camera quantum efficiency drop off, the filter or just the nebula.  Anyway, I ended up taking about 2 hours of OIII along with 30 minutes of HA and SII.The result is below:


I plan on returning to the Viel at some point but for now IC 1805 is in an excellent location for some imaging.  So despite some persistent clouds and an issue with my autoguider I managed to pick up 15 x 900s OIII exposures. Since I didn't take any HA or SII images yet the image is monochrome.


Saturday, July 19, 2014

Narrowband Images of M27

After several weeks of waiting I finally have a working filter wheel for my SBIG camera.  I was hoping to buy another SBIG filter wheel but unfortunately they no longer make the CW10 filter wheel for my camera.  So I opted to go with a third party filter wheel from Xagyl Astronomy.  Initially there was a problem with the clearance of the filters and I had to send it back.  However after waiting a few weeks it arrived and worked perfectly!  So despite the short nights and relatively poor weather I was anxious to try it out.  Below are the first images of M27.

 Narrowband Imaging

15 min HA filter
If you`re not familar with the concept behind narrowband imaging its fairly straightforward.  All elements have a characteristic set of colours they emit that depends on their electron configurations.  What that means is that certain gases will glow in a very specific colour band.  By using a filter that is tuned to that colour astronomers avoid any stray light.  In my case, since my observatory is in a suburban environment, that is a huge benefit.  Once you have the images of several colours (which corresponds to particular elements) the images are combine in photoshop or some other processing software.

15 min OIII filter
There are some drawbacks however; because several different images are combine together you need to take images through three or four different filters.  This can increase the exposure time.  However, I recently read an article that said even though you increase the exposure time the SNR (signal to noise ratio) of each individual image is actually better than it would be for a single, colour image.  I haven`t tested that myself yet but so far I like the images I can get from light polluted skies!

15 min SII filter
Each of the images represent one of the monochrome Sulfur (SII), Oxygen (OIII), and Hydrogen (HA) images.  Each image was stacked from roughly 15 minutes of images.  In total I only got five 3 minute images before I had to hit the sack.  When the weather clears up I plan on imaging M27 again with longer exposures (and better tracking) to bring out more detail and less noise.

 Once the images are gathered I processed each on individually by stretching the histograms so they were all more or less equal.  Nebulosity has several useful tools for aligning and stacking each image. After processing I combine the images using the Hubble Colour Palette.

This maps the Sulfur image into the Red Colour Channel, the Hydrogen Alpha image in the Green Colour channel and the Oxygen III image in the Blue Colour Channel. The result is a nice colour image with the characteristic teal and gold colours of Hubble images.
Hubble Colour Palette


Sunday, June 22, 2014

Suburban Star Gazing at its Finest

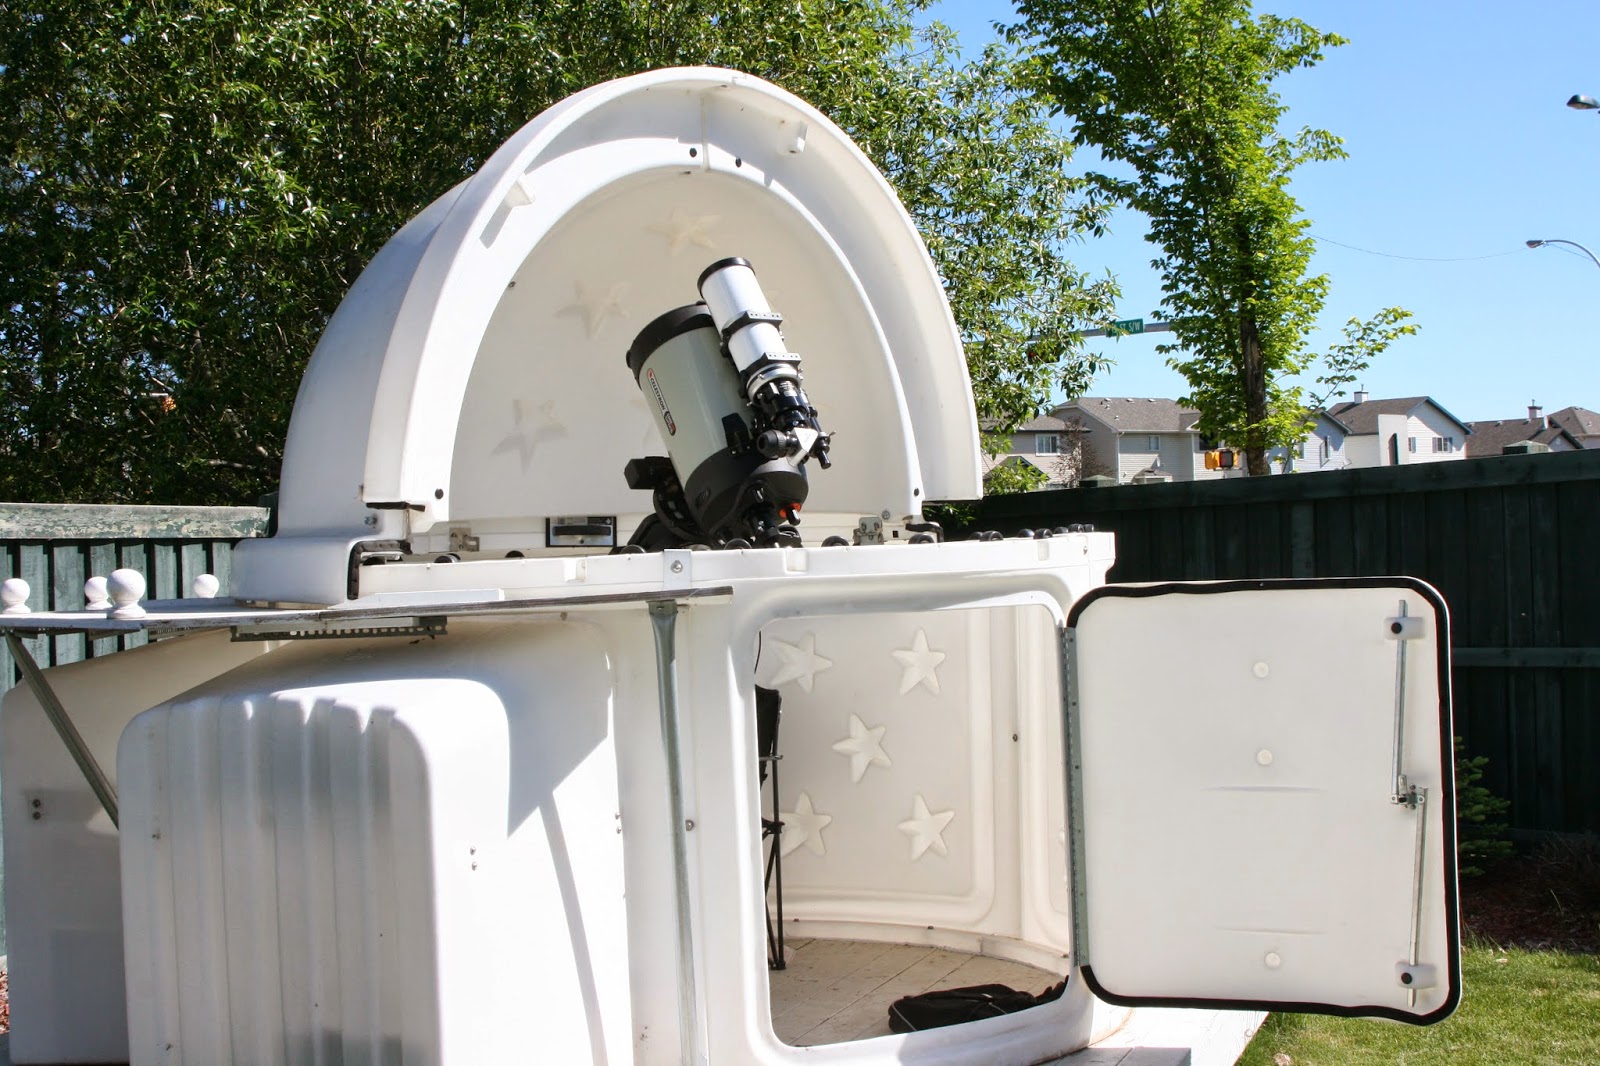
Over the past few weeks I've been really pushing to put the 'finishing' touches on my observatory (although if you asked my wife she would just roll her eyes; deep down she knows it will never REALLY be done).  The latest and most time consuming addition has been moving from the tripod simply resting of the observatory floor to a separated concrete pier.  With the help of my brother and brothers' in law I was able to get the piling poured and all the equipment back in the dome in just under two weeks.  Despite yesterday being the summer solstice (and the shortest night of the year) I got to test it under beautifully clear skies.  The rest was amazing!  The alignment is still off by about 40 or 50 arcseconds but it definitely works well enough for simple pointing.  I can't wait for darker skies in the fall!
The video below is a short time lapse of the pier construction.  I realised after the fact that it was a bit too far away to provide much detail of the actual construction process but it was actually a lot simpler than I first thought.


I had to go back and make some minor changes though.  We put the anchors in the wrong spot and initially, the polar axis was impossible to align.  Rather than take the entire piling apart or chisel out the anchors I just tapped a couple new holes in the base plate and now it works perfectly!


After the concrete set and the mount was installed I brought in all the optics and electronics.  I had to build a small table for the computer monitor since my initial shelf didn't have enough clearance.  Providing AC power to the observatory was straightforward - just rewired an existing outlet and run the line into the dome.  I still want to add some dim, red lights in the interior but that can wait for another weekend.

Other than that, the Observatory is now full stocked and operational!  The specific details are below:
Mount: Skywatcher EQ8
Telescopes: Celestron Edge 11" & Skywatcher Espirit 100 mm
Cameras: Lumenera Lu135m, SBIG STX2000XM & Lodestar autoguider
I've also got a variety of narrowband and LRGB filters along with a couple white light solar filters.

(View from my chair)
(The telescopes)


(My wife loves the fact that most of my gear can be stored out of sight now!)


The only thing I think I'm 'missing' is a nice HA solar telescope.  Alas, I think the limits of my wife's indulgence has been reached for the time being.

In addition to my usual astrophotography I've been dabbling in photometry and spectroscopy (although with the short nights of summer and the terrible spring weather, the past two or three months haven't seen near as much stargazing as I'd like.  However, by August or September, I hope to pick up where I left of in April and continue doing some Exoplanet observing.  Now, with everything set up and ready to go, hopefully things will be much simpler.

The only downside to this exciting project is the fact that its not really under dark skies. The suburban Edmonton skies are only about a magnitude 3 or maybe 4.  Still, I've done some excellent narrowband imaging last year and with an 11 month old baby I don't have the same flexibility as I used to; late nights for me now mean changing diapers and crying babies instead of nebulae and galaxies. 

Tuesday, June 10, 2014

Planetary Imaging

A couple of years ago I bought a Lumenera Lu135 industrial camera and retrofitted it for planetary imaging. All that really involved was putting a 1.25" barrel on it that I bought from Xagyl Instruments (I love supporting Canadian companies!).  Its an amazing camera! For just under $300 I acquired a camera that would have cost me over $2000 if it was specialized for Astronomy.  In fact, you can compare the Lumenera Skynx 2.0 and the Lu135m cameras.  They are virtually identical except the Skynx is marketing for Astroimaging while the Lu135 isn't.  (It also helps that I got my camera used on ebay).

Since its a monochrome camera taking colour photos was a bit of a challenge.  It involved taking on series of photos with a Luminence filter (essentially just a UV/IR filter) and then one each in Red, Blue and Green; hence the name LRGB.  It was a bit frustrating to remove the camera, unscrew a filter, screw in the new one, replace the camera, correct the orientation and then refocus it.  Then about a month ago I bought a manual filter wheel and a cheap set of LRGB filters from Meade.  Right now Meade is selling the LRGB set for under $30.00. Its a steal if you're looking to get into LRGB imaging.  They aren't quite the same quality as something from Astrodon or Lumicon but at 1/10 the price I'm not going to argue.

Anyway, a few months ago I took some decent pictures of Jupiter and then just last week I started pointing my telescope towards Saturn. The 4 images below are the Luminence, Red, Green and Blue images I took.  They aren't in colour, just taken through colour filters.  Then using a program like Photoshop or Nebulosity each image is mapped into a colour channel.  The three colour channels (RGB) are combine with the Luminence image to create a composite colour image.


Luminence


Red


Blue


Green


The composite colour image is below.  I think my exposure time was too long so the images are slightly overexposed.  Its also unfortunate that Saturn is very low in the Southern horizon right now.  Double bad is that because its the middle of summer it doesn't get dark out until around midnight.  This means there are few, if any, really good opporunities to image Saturn.  And even then Saturn is only about 25 degrees above the horizon.  Jupiter on the other hand was well above 60 degrees.  That made for less light pollution and less atmosphere to shoot through.  Ditto for Mars.


Saturn LRGB

I've also included a shot I took of Jupiter and one of Mars.


Jupiter shows a lot more detail because it much bigger than Mars.  In fact even through a small telescope or binoculars its possible to see the four moons Galileo first looked at more than 400 years ago.  Despite the smaller size, the image of Mars is really quite interesting.  You can clearly see the Northern and Southern Ice caps along with some darker highlands and lighter plains.  The white ice caps are actually made not of water but mostly frozen Carbon Dioxide!


Saturday, April 12, 2014

Latest Picks

I haven't had a chance to do lots of stargazing lately.  Between poor weather, work and other commitments its been tough to find time.  However last week spent about an hour looking at the moon. I'm not especially interesting in the moon, it just seems like the weather only cooperates up to a point.  Last week the night started out clear but I could tell clouds were closing in so there wasn't much point in any deep sky photography.  I took some quick spectra of Sirius and then took a high resolution picture of the moon.

Siruis Spectra
About two months ago I bought a Star Analyzer diffraction grating.  It looks just like a normal 1.25" filter but is actually a low resolution diffraction graphing which effectively turns my telescope into a spectroscope. I've found a nice program for analysing the resulting specturm; the image below is a screen shot of a quick run through of a Spectrum of Sirius.


Its pretty easy to see the Hydrogen Balmer lines (which are the dips in graph).  I know there is more detail in the graph I can pull out but I'm still figure out how to record all of it.  More to come on that later.

Lunar Panorama
I've taking many pictures of the Moon over the past few years.  This one was the highest resultion and took the most time.  Its a result of over 15,000 images! I used my 11" SCT with a Lumunera Lu135m.  The field of view was only about 20" so it required 16 panels that were then merged in photoshop. Each of the panels was made up of 1000 images that were processed in Registax.  The actualy time to acquire all the pictures wasn't more than about 30 minutes but the processing and photomerging took over 2 hours.  The end result is a great, highly detailed image of the moon!