
Unlike a filter it doesn't so much block light as it does spread it out. Much like a prism, the diffraction grating spreads the spectrum of light so each colour or wavelength is visible. Depending on the star being analyzed different absorption or emission lines will also be visible.
This is actually one of the most interesting accessories I've ever seen for a telescope. I've had some baby issues to take care of so I haven't actually been out in the observatory as much as I'd like to I did manage to get some great results. Before I get to that though I should mention a few things about the diffraction grating. It doesn't work like a typical 1.25" filter. Instead of simply putting it in front of the eye piece and looking for the spectrum its important to make sure the distance between diffraction grating and your eye (or in my case camera) is long enough. Otherwise the spectrum won't spread out very much and it will be difficult to look at the absorption or emission lines. As well, if you use a camera of some sort its also important to make sure the grating lines are perpendicular to the CCD.
I'm using this with a telescope and DSLR but its actually designed to work with a CCD imager. However as you'll see it works fairly well on the DSLR/telesocpe combination and I can't see any reason why it wouldn't work with just a DSLR and lens as long as you could find a way to attach the diffraction grating to the front of the lens.
The spectrum below is of Altair.
 I forgot to switch modes so this is a monochrome image. It actually doesn't make much difference to the absorption lines, a few of which you can see really clearly. I moved the telescope very slowly in DEC which sort of smeared the spectrum vertically to make the lines easier to see. The bright dot on the left hand side is the central maximum with the spectrum itself off to the right. Two of the Balmer lines are visible on the left side of the spectrum; had this not been a monochrome image it would be in the violet and blue part of the spectrum.
This is actually one of the most interesting accessories I've ever seen for a telescope. I've had some baby issues to take care of so I haven't actually been out in the observatory as much as I'd like to I did manage to get some great results. Before I get to that though I should mention a few things about the diffraction grating. It doesn't work like a typical 1.25" filter. Instead of simply putting it in front of the eye piece and looking for the spectrum its important to make sure the distance between diffraction grating and your eye (or in my case camera) is long enough. Otherwise the spectrum won't spread out very much and it will be difficult to look at the absorption or emission lines. As well, if you use a camera of some sort its also important to make sure the grating lines are perpendicular to the CCD.
I'm using this with a telescope and DSLR but its actually designed to work with a CCD imager. However as you'll see it works fairly well on the DSLR/telesocpe combination and I can't see any reason why it wouldn't work with just a DSLR and lens as long as you could find a way to attach the diffraction grating to the front of the lens.
The spectrum below is of Altair.

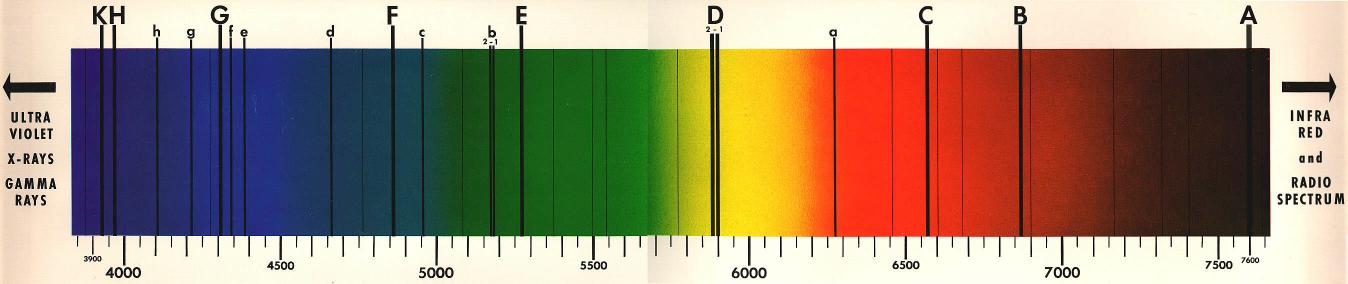
The next spectrum I looked at was actually of the sun. Its a bit more complicated than just pointing the telescope at the sun since you need a point source to shine through the diffraction grating. I used a sewing needle to reflect sunlight off of and pointed my telescope at that. The solar spectrum is below:
There is much more I'd like try with the diffraction grating but that will have to wait. For the time being I to put a concrete piling in my backyard and set up my new mount which will hopefully arrive in the next couple of weeks!