Saturday, March 1, 2014

EQ8 and a cold winter of Stargazing

My new mount arrived about 3 months ago (a big thanks to Nick and everyone else at the Vancouver Telescope Center!).  I must say sheer size of the EQ8 completely blew me away.  I thought the EQ6 was decently sized by by comparison the EQ6 is just a toy. Aside from the size and weight the mount performs beautifully.  Tracking is amazing and it easily carries my SCT, Refractor and Imaging gear.

Last winter I was limited to setting my telescope up in my driveway, spending about an hour getting it properly aligned and then checking on it periodically.  That has all changed! Since I got my Skyshed Pod set up in the backyard I no longer have to set up and take down my telescope or cart all the gear back inside.  I really only had to align it once at the beginning of the winter (although since the ground froze it has shifted a bit).  The best part is that I can run the mount, camera and autoguider all from the comfort of my house using Teamviewer.


Ironically, despite the fact that I have a ready to go observatory at my disposal there have been few observing opportunities.  Until recently its been an incredibly cloudy, snowy winter.  And now that its clear its unbearably cold; with the windchill it was -50 last night! Although I don't need to be outside to run anything, temperatures that cold are not good for the equipment- my cutoff is around -25.  I've also been working with my new Monochrome CCD camera to try and figure out exactly how to process images with it.  I think I've gotten most of the bugs out of that; now all I need is suitable observing condition.

Throughout the winter Jupiter has been well positioned for observing. At its transit I think its over 50o.  Below are some of the few images I've taken this winter; all are taken with my Lumenera 135m video camera and stacked using Registax.

  
This image of Jupiter is the first composite (LRGB) planetary image I've taken.  I used a monochrome camera with LRGB filters and combine the images using Nebulosity.  If I remember correctly, this was 5000 L frames and 1500 each of RGB, using the best 20%. 


This high resolution photo of the Compernicus crater was taken through my Celestron 11 HD using a Lumenera 135m camera.  500 frames, stacking the best 15%.

About 3 weeks ago, (if you used an appropriate solar filter) there was a set of sunspots you could see without a telescope.  Here in this image (taken with my 85 mm refractor) you can see two groups of sun spots.  Each of the central sunspots is larger then the entire Earth!
 

Here is a close up of the largest part of the sun spots.  Its slightly out of focus for some reason, but still amazing detail. The dark central area is called the Umbra and its the location on the Solar Surface where the Sun's magnetic field is nearly perpendicular to the surface.  The lighter area is called the Preumbra area and occurs because the magnetic field is at more of an inclination to the rest of the surface.

Hopefully the weather improves and more astronomy can be done!


Sunday, October 13, 2013

A Month of the Moon

Over the past year I haven't had near as many opportunities as I'd like to do astrophotography.  Its been due to a combination of factors including weather, moving, and the birth of my daughter.  However I have been able to get quite a few nice shots of the moon.  The picture below shows 5 different phases of the moon that would roughly follow it over its 27.3 day period.


This wasn't actually taken over a single month.  Like I said weather tended to get in the way from one day to the next so it actually took me nearly a year to get all 5 images; if you've been reading my blog you've probably noticed one or two of them individually. 

Interestingly enough many people are actually confused about why we see different phases of the moon.  It definitely has to do with the moon orbiting around the Earth.  But it has as much to do with the position of the sun as it does with the moon.  Think of the moon like a giant mirror.  The moon doesn't create its own light. Just like a mirror it reflects light.  And where does that light come from?  The sun!  Now if the moon is on the opposite side of the Earth as the Sun all that light gets reflected towards the Earth.  But if the moon and the sun are on the same side of the Earth NONE of the light bounces towards the Earth.  In fact, if the moon and the sun align just right the moon can actually block the sun's light and we get an eclipse.

The image above shows the arrangement of the Earth, Moon and Sun (off to the right) that leads to the lunar phases.

A full orbit of the moon takes about 27.3 days (It actually takes the moon 29.5 days to reach the same position in the sky because while the moon is moving so it the earth.  That's called the synodic period b). Its no coincidence that a lunar orbit corresponds to a full month. Early calendars were based on this lunar cycle. 

Its also interesting to note that we don't see a solar eclipse once a month as you might expect.  While the moon moves between the Earth and the Sun every 27.3 days it doesn't always line up with the sun. That's because the moon's orbit is inclined about five degrees with respect to the sun's orbit.  That means that there are only a few times a year when a solar eclipse is possible.  In order for an eclipse to actually occur at one of those times they must occur at the new moon (when the moon and the sun are on the same side as the Earth. The diagram below gives a good visual of this.


The only times a Solar Eclipse can happen is when the moons shadow falls on the Earth.  As you can see from the diagram there are lots of times when the lunar shadow is above or below the Earth but only a few when it actually hits the Earth.

So the next time you look up and see the moon in sky try and figure out where it is in relation to the Earth and Sun!

Tuesday, September 3, 2013

Spectroscopy

With the (more or less) completion of my observatory I've turned my interested to Stellar Spectrums.  I borrowed a Star Analyzer diffraction grating from a friend to test it out.  The Star Analyser looks just like a threaded 1.25" filter and screws into the T-ring of my camera.

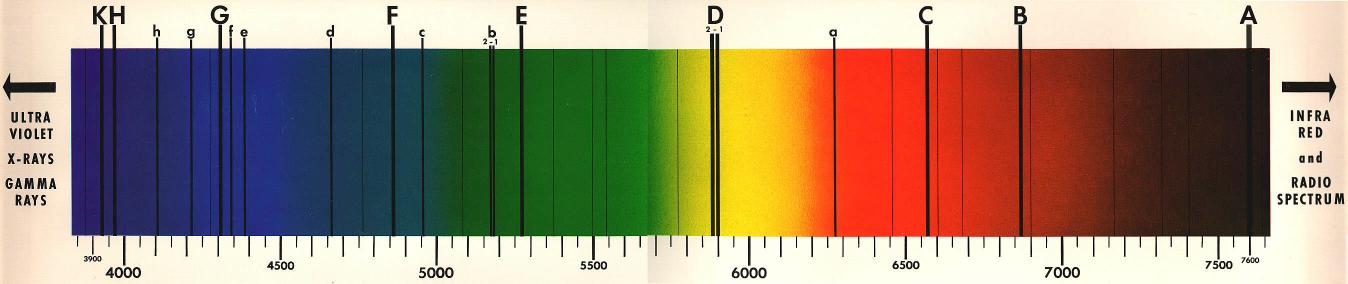
Unlike a filter it doesn't so much block light as it does spread it out.  Much like a prism, the diffraction grating spreads the spectrum of light so each colour or wavelength is visible.  Depending on the star being analyzed different absorption or emission lines will also be visible.

This is actually one of the most interesting accessories I've ever seen for a telescope.  I've had some baby issues to take care of so I haven't actually been out in the observatory as much as I'd like to I did manage to get some great results.  Before I get to that  though I should mention a few things about the diffraction grating.  It doesn't work like a typical 1.25" filter.  Instead of simply putting it in front of the eye piece and looking for the spectrum its important to make sure the distance between diffraction grating and your eye (or in my case camera) is long enough.  Otherwise the spectrum won't spread out very much and it will be difficult to look at the absorption or emission lines.  As well, if you use a camera of some sort its also important to make sure the grating lines are perpendicular to the CCD.

I'm using this with a telescope and DSLR but its actually designed to work with a CCD imager.  However as you'll see it works fairly well on the DSLR/telesocpe combination and I can't see any reason why it wouldn't work with just a DSLR and lens as long as you could find a way to attach the diffraction grating to the front of the lens.

The spectrum below is of Altair.

I forgot to switch modes so this is a monochrome image.  It actually doesn't make much difference to the absorption lines, a few of which you can see really clearly.  I moved the telescope very slowly in DEC which sort of smeared the spectrum vertically to make the lines easier to see. The bright dot on the left hand side is the central maximum with the spectrum itself off to the right.  Two of the Balmer lines are visible on the left side of the spectrum; had this not been a monochrome image it would be in the violet and blue part of the spectrum. 

 The next spectrum I looked at was actually of the sun.  Its a bit more complicated than just pointing the telescope at the sun since you need a point source to shine through the diffraction grating.  I used a sewing needle to reflect sunlight off of and pointed my telescope at that.  The solar spectrum is below:


The needle was off to the left. The image is a bit washed out because the sun is SO bright that it saturated some of the camera pixels.  If you look closely you can see a number of absorption lines in this emission spectrum. Those lines are the finger prints of all the elements in the cooler atmosphere of the sun.  There, elements too cold to emit light themselves but they absorb specific wavelengths of light that pass through them. Using a professional grade diffraction grating/CCD the lines look something like this:


There is much more I'd like try with the diffraction grating but that will have to wait.  For the time being I to put a concrete piling in my backyard and set up my new mount which will hopefully arrive in the next couple of weeks!

Wednesday, August 28, 2013

First Light in the Pod

After putting the finishing touches on my new observatory I moved the two telescopes about 3 weeks ago. Since then I've decided to put my 11" SCT telescope into hibernation until my new mount arrives.  So for the next few weeks I've 'stuck' with my 85 mm Televue Refractor.

Lately I've been testing the effects of sky glow of photography and photometry from my observatory.  I had some decent success with the Delphini NOVA but overstaruated some of the pixels so didn't get any very useful data. Since then I've done a bit of deep sky photography but mostly focused on the moon and sun.


Dumbbell Nebula

The image to the right is the dumbbell Nebula taken from suburban Edmonton. Remarkably this image is unfiltered so nothing was blocking the light from the city.  This was taken with the 11" SCT (before being put into hibernation) and is made up of just over an hour of 2 minute sub-exposures using a modified Canon T3i.


Ring Nebula
I also tested the optics/light pollution on the Ring Nebula because its a reasonably bright target that happens to be conveniently located right now. This was also about an hour of 2 minute sub-exposures.

In addition to those deep sky images I've also taken some pictures of the Moon with my Lumenera 135m video camera.  They've turned out quite well and I'm hoping to get a full 'lunar portrait' of all the different phases of the moon.


The last image I took was with the Lumenera and a small solar filter.  This white light picture of the sun is actually two different images that were combined using photoshop.  The individual images were made up of 1000 images aligned and stacked in Registax.


I'm definitely hoping to make more use of the new observatory but for the time being I'm just trying to keep my head above water with the new baby!


Sunday, August 18, 2013

Building an Observatory

After years of packing my mount and telescope out of the city I finally have my own observatory!

I noticed an ad in the local RASC newsletter about someone selling a SkyShed Pod and within a week I had purchased and transported the entire observatory.  SkyShed Pods are essentially a polyethylene clamshell dome.  It stands about 7 feet tall and has a diameter of about 10 feet.  The model I bought also has 3 storage bays.


The first task in setting up the pod was transporting it.  I was actually incredibly lucky because someone in Edmonton was selling one.  Although they are relatively cheap (new ones cost around $3500) transporting them across Canada can add almost 25% to the price.  However, transporting it across the city was an all day job.

Once I unloaded it at home it stayed in my garage for about a week while I cleaned it and figured out exactly where it would be situated.  I built a wooden deck in my backyard that the Pod sits on and ran an electrical line into it.  Once the Pod was assembled I weather treated it with silicon sealant and moved the gear in!

The only thing I still need to do is to add a permanent concrete pier to support the mount & telescope.  I seriously thought about doing this before I assembled the observatory but there were several reasons why I didn't.  First, my wife was 8 months pregnant when I finally got the Pod.  I wanted to make sure the optics were installed before the baby was born so I could open it up and use it even with a newborn. Second, I just put a deposit on a new mount; the Skywatcher EQ8. I want to make sure whatever pier I build will suit that mount so I'm waiting until it arrives.

However, since the observatory is already assembled digging the hole for the concrete will be quite the challenge.  I've talked with several people about the depth of the pier and I've gotten several different answers.  My sister and her husband (both civil engineers) insist that I should dig at least 8 feet, even going as deep as 12 feet.  My brother (a journeyman carpenter) has suggested between 6 and 8 feet.  A professional astronomer friend (who built his own observatory 15 years ago) has said 4 feet is sufficient.  I'll probably go with the 4 foot depth, simply because its easier and even if there is a bit of shifted I can adjust the adapter plate.

The Observatory is complete! All I need now are clear skies! Anyone know how much those cost?


Sunday, May 26, 2013

How to: Photometry

Recently I've gotten very interested in photometry (the measurement of light from stars).  Compared to the deep sky astrophotography I've done in the past the image gathering is actually very straightforward. However the actual analysis is a bit more complicated so I've decided to write a short blog post on this.

Photometry Light Curves

The goal of photometry is to produce a graph that shows the changing light emitted by a star.  One example is the graph below. Its the light curve for the Eclipsing Variable Star U Cephei.

The Star's magnitude is plotted along the y-axis. Since higher magnitudes correspond to dimmer stars its graphed in reverse order.  Time (in Julian Date) is on the x-axis.  Julian Date (JD) is often used because it provides a simple way to record time as rational numbers with having to worry about fractions of hours or daylight savings time or other interesting quirks of a 24 hours clock.  

Hardware
In principle doing differential photometry is very easy.  All you need is a tripod and a DSLR camera that can take long exposure photographs.  If you uses a camera tripod that isn't capable of polar tracking the exposure times will be limited to about 30 seconds (depending of the lens you use) before the stars will begin to trail.  I attached my DSLR camera to my 85 mm refractor and used my tracking mount; in this configuration the exposure time is limited by the saturation limit of the camera.  Depending on the target that can be anywhere from a few tens of seconds to a few minutes. 

Choosing a Target
There are thousands of variable stars within reach of surprisingly modest equipment.  A simple tracking mount and a DSLR camera can record variations in stars as faint as 11th or 12th magnitude.  An 11" telescope can reach as far as 14th or 15th magnitude.  
 
Probably the best place to find lists of Variable Stars would be the American Association of Variable Star Observers. You'll also find a huge amount of reference and resource information on the how-to of pretty much every aspect.

Aside from the magnitude of the variable star you chose there are a few other things you should consider.  How big will the variation be and will your equipment be sufficiently precise to measure it accurately?  How often will minimums occur and will they occur when viewing is favourable?  How high in the sky will the target star be?  For people who have done astrophotography most of this is routine but if you're just getting started its important to keep them in mind.

Software
There are several different software packages that are capable of taking raw camera data and producing useable photometric data.  The three that I recommed are:
  1. IRIS
  2. AIP4WIN
  3. MaximDL
I've used IRIS quite extensively mostly because its free to download. Depending on how precise you want your data it is capable of doing dark, flat and offset subtraction as well as alignment and stacking.  However the interface is not the most straightforward.  Despite this I still use it because its free and there are excellent tutorials available online.

AIP4WIN is another great alternative.  It costs about $100 but comes with an excellent book (or the book comes with AIP4WIN, depending how you look at it) on variable star observing.  Aside from a quick cursory look at it I haven't used it but I heard excellent things about it.

If you want a sleek, well thought out, multiuse software package (and don't mind spending $600) then check out MaximDL.  It will do pretty much everything an astronomer or astrophotographer could ask for, including Photometry.  Beware: The basic and DSLR versions DO NOT come with photometry tools!

Results
Below is the (partial) light curve for W Ursae Majoris.  This is a contact binary system with a period of just over 8 hours. 
   
The x-axis is typically in Julian Date since you don't have to worry about the 24 h clock and things like daylight savings time.  To convert from our normal 24 hour clock/date to Julian Date I've used the USNO Julian Date Converter. The results you get from DSLR or CCD cameras are ADU (analog-digit units); basically a measure of how many photo electrons are recorded in the sensors.  These are basically telling you what the intensity of the star is.  However to create a light curve like the one above you need to change intensity to magnitude.  You can do that using the equation below:

m1 - m2 = -2.5 log(I2/I1)

This equation will basically tell you the difference in magnitudes between two stars.  So that means you actually have to do a measurement on TWO stars.  One that has a constant magnitude and your variable star.  Then you plug the intensity values into this equation and you get the difference in magnitude.  In fact, spreadsheet programs like Excel can actually automate most of the calculations.  The result will be a nice light curve! And just think about what this curve shows! You're looking at subtle changes in stars light years away! 

Good luck!

Friday, March 1, 2013

Photometry

After a little over 2 years of deep sky photography my interests have turned to Variable Stars and Extra-Solar Planets.  Since November I've been working on creating a light curve for an Eclipsing Binary Star with my DSLR.  My original plan was Algol since its nice and bright and could probably be captured with a simple tripod mounted DSLR. In addition Sky and Telescope has a nice calculator for the minimum (http://www.skyandtelescope.com/observing/objects/variablestars/Minima_of_Algol.html). As I soon found out the nearly 3 day period made it difficult for me to arrange to photograph. Because of work I could only do imaging on the weekends so I was looking for a minimum on the weekend, obviously in the evening and with good weather.  As it turned out, this winter has been terrible in terms of cloud cover.  And the weekends that were clear also tended to be devoid on Algol minimums. 

My alternative was to focus on faster period stars so I settled on the moderately faint W Ursae Majoris.  Not only did this star meet the faster period requirements I wanted (8 hours) but during the winter it was also high in the sky and would be up all night. 


It took about a month to finally get some clear skies but after I found some decent skies the actual data gathering was quite quick. After two consecutive Saturday evenings I was able to gather enough data to produce this light curve:


This was made before I thought to put the orbital phase on the x-axis so the two different nights are represented in different colours.  Its a pretty straightforward light curve that easily shows the minimum of W UMa. The magnitude of W UMa is nearly 8 and varies by just over half a magnitude.  Considering the tools I'm using (an uncooled Canon DSLR) I'm fairly happy with the results.  Over the past few weeks I've gotten much more interested in extra-solar planets and I'm going to see if I can apply the same methods to detecting exoplanet transits; I can across and interesting group that is doing almost that very thing: http://www.planethunters.org/.

However before I get to into this next project I need to see if my camera is up to the task.  For W UMa binary stars the change in brightness is around 0.50 - 0.75 magnitudes.  For extra-solar planets the most I can expect is around 0.0030 magnitudes.  I'm not convinced that change in brightness will actually be above the noise level of the camera's sensor.  So next up will be the test of the noise levels of the Canon T3i.

Stay tuned!